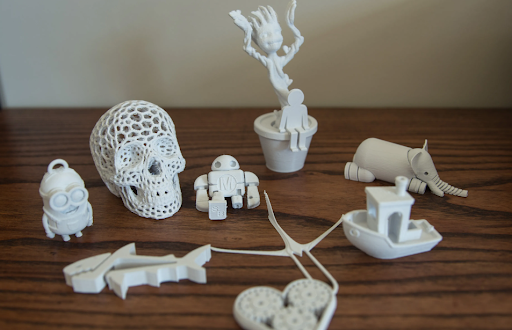
3D printing is applied in a variety of fields to produce objects from basic to complex
3D printing is one of the most popular and modern printing methods today.The term 3D stands for 3-Dimension. 3D printing is an additive manufacturing technology to create 3-dimensional objects according to desired designs. In the 3D printing industry, material layers will be set up sequentially and repeatedly by the printer or printing software until the product is complete. Currently, 3D printing is applied in a variety of fields to produce objects from basic to complex. Materials used in 3D printing are also quite diverse, ranging from plastic, metal, ceramics and even food.
The 3D printing method brings many great benefits. 3D printing provides images of objects many times more vivid than other methods. In addition, advantages such as meeting a variety of printing designs, high detail, automation, etc. are also big pluses of 3D printing. Besides, 3D printing also has the risk of encountering some problems during operation. These problems can be easily handled with the solutions proposed below!
1. Problems you might encounter in 3D printing
1.1. 3D printing products not sticking to the bed
3D printing products not sticking to the printing bed is also due to lack of adhesion
3D printing products not sticking to the printing bed is one of the most common problems in the 3D printing process. These cases often lie in the fact that the first layer is not certain. In addition, the reason for the problem of 3D printing products not sticking to the printing bed is also due to lack of adhesion. This problem often occurs and leads to the 3D printing being deformed, the product not forming, or a mess. This problem has been researched and a number of causes have been identified. Some common causes are that the 3D printed bed is unbalanced, warped, deformed, not cleaned, etc.
Solutions for 3D printing products that do not stick to the printing bed can be mentioned as follows:
- Check the balance: checking the balance and measuring the balance of the 3D printing bed is very important. In some cases, screws can be used to fix the corner of the bed.
- Check the surface: check 3D printing bed surface before printing to detect warping and deformation of the bed early.
- Clean the surface: thoroughly clean the 3D printing bed surface to avoid factors such as fingerprints, oil stains, print debris, etc.
1.2. Filament not feeding properly
Errors in the filament supply process for 3D printing can be determined based on the fact that some factors are deformed filament
3D printing can face problems with the filament supply process for the printer. Some common phenomena are that the machine is overloaded with the required amount of material, the filament is disturbed, the filament is deformed, etc. This problem can ruin the print at any time. More seriously, they can cause damage to your 3D printing machine. The first telltale sign can be based on the noise the engine makes during operation. Errors in the filament supply process for 3D printing can be determined based on the fact that some factors are deformed filament, lack of tension, high friction, PTFE liner wear, clogged nozzle.
Effective solutions to the problem of filament errors in the 3D printing process can be applied as:
- Check the quality of the filament: checking that the filament material must meet the quality of shape, size, etc. will help the 3D printing process go smoother.
- Check tension and friction: continuously monitor and check the tension and friction of the filament during the 3D printing process to promptly handle the phenomenon of overheating, over coldness or filament tangling.
- Check the PTFE lining: during the 3D printing process, the PTFE lining needs to be thoroughly inspected for timely maintenance or replacement in case they are worn. In addition, it is necessary to carefully check the PTFE gaps to ensure the quality of the print.
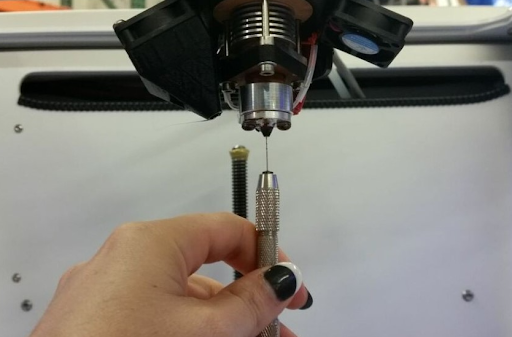
- Cleaning the nozzle: regularly cleaning the nozzle is one of the essential operations in the 3D printing process. This helps overcome bottlenecks in the 3D printing process.
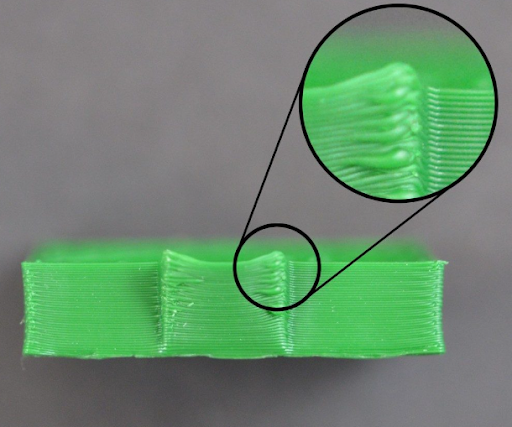
1.3. Stringing
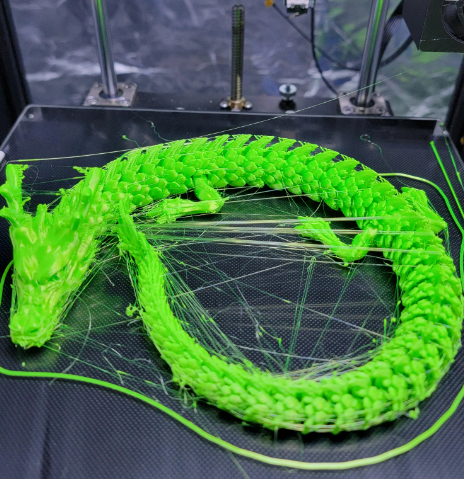
Stringing is that some parameters and ratios of printed items have been set incorrectly
In 3D printing, threading is one of the problems that frequently appears. The common cause of this phenomenon is due to errors during the print settings process. Specifically, it can be understood that some parameters and ratios of printed items have been set incorrectly or have been set for many printed objects at the same time. When this problem occurs, they will leave excess plastic borders on the 3D printing, or a few pieces of plastic glued together unnecessarily on the product.
Some useful solutions for threading in 3D printing:
- Use a heat gun: a heat gun can melt the stringing between printed objects. Note that with this method we need to be careful and meticulous to avoid product damage.
- Choose the right print settings: there are many print settings available on the devices. Depending on your printing needs, consider the appropriate print installation program. Make sure your print settings are correct if you are setting up your own print settings.
- Check the tension bolts: it is necessary to check and ensure that the Tension bolts located on the extruder working set are properly tightened.
- Reduce nozzle temperature: Reduced nozzle pouring heat will help reduce strings. The temperature drop will range from 5 - 10°C.
1.4. Layer shifting
Layer movement will unintentionally change the position of the printed layer in 3D printing
In 3D printing, layer movement will unintentionally change the position of the printed layer according to the design. The cause of this error is usually due to the incorrect movement of the shaft. When the axis changes, the extruder head may become misaligned during the 3D printing process. This problem will cause the print to become deformed or crack easily.
Here are a few useful solutions to this problem in the 3D printing process:
- Check the belt: the belt needs to be tightened to ensure the stability of the shaft.
- Check the shaft pulley: fixing the pulley is a very important step. Loose pulleys are often the main cause of movement of 3D printing layers.
- Ensuring shaft movement: ensuring the shaft will operate smoothly and smoothly is essential. We need to minimize the cases of shafts getting stuck, getting caught in belts, etc.
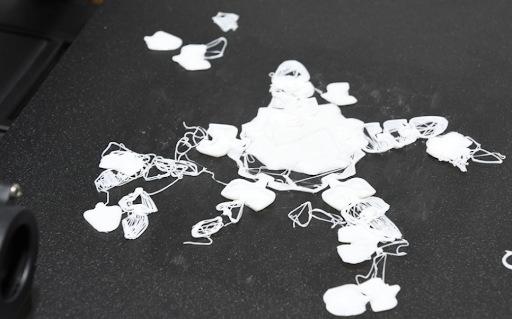
1.5. The extruder creates blobs
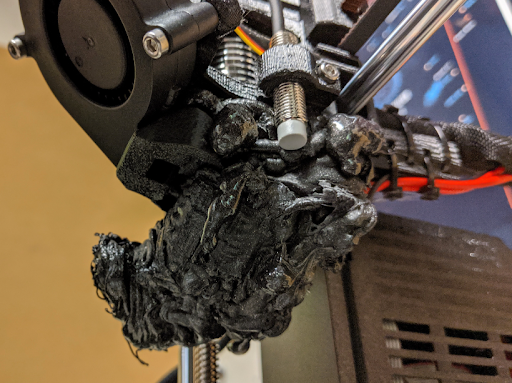
Blob usually happens in the first 5 minutes of the 3D printing process and causes the printer to not work
This is one of the extremely bad problems that occur during the 3D printing process. This problem will manifest quite early in the 3D printing process. When experiencing a blob extruder situation, the first printed layers will peel off and cover the nozzle. As the nozzle is covered and the extruder continues to operate, the blobs will grow larger and larger. This usually happens in the first 5 minutes of the 3D printing process and causes the printer to not work.
Some effective measures to prevent this problem include the following:
- Check the first printed layer: checking the first layer is very important and helps prevent not only the blob extruder problem but many other problems at the earliest. It is necessary to ensure that the first printing layer is printed in a perfect state and adheres well to protect the entire printing process later.
- Observe carefully the first 5–10 minutes: because the blob extruder phenomenon is easy to detect in the first 5 to 10 minutes, careful observation is the most effective measure. If we detect a problem, we can restart the printing process from the beginning, otherwise we can rest assured that the extruder will not create blobs.
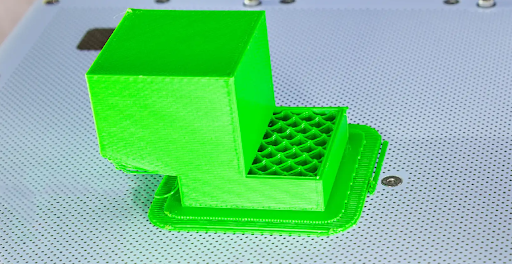
1.6. Large gaps between borders and parts
When the 3D printing machine operates at maximum capacity, it can lead to unwanted borders and gaps on the product
The appearance of visible gaps can cause loss of aesthetics for your 3D printing product. The cause of this problem can stem from reduced layer alignment or incorrectly programmed border overlap. In addition, when the 3D printing machine operates at maximum capacity, it can lead to unwanted borders and gaps on the product. In addition to being unaesthetic, they also cause the necessary structure of the product to weaken or lose its perfection.
The solution that might help with this problem is as follows:
- Adjusting printing speed: it can be said that this is the main cause of the above problem. Adjusting the print speed will help rebalance the infill joint configuration. This problem will be solved in the neatest and simplest way.
1.7. Cracked or separated layers
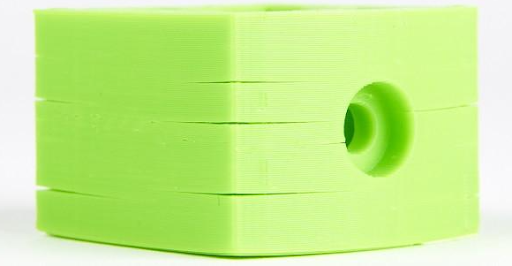
The 3D printing process can face the problem of printed objects cracking or separating layers
The 3D printing process can face the problem of printed objects cracking or separating layers. More specifically, the printed object's connection between printed layers is not tight and is separated. The main cause of this problem is that the adhesion between the printed layers is too poor, leading to them not sticking together tightly. Separation of printed layers also occurs when there is a temperature difference between them.
Some proposed solutions to this problem are as follows:
- Increase/decrease the speed of the layer fan: in each case we will choose to increase or decrease the fan speed accordingly.
- Shield the printer: creating a warmer environment during the printing process will somewhat limit this situation. This action will help avoid drafts that cause erratic temperature changes in 3D printing.
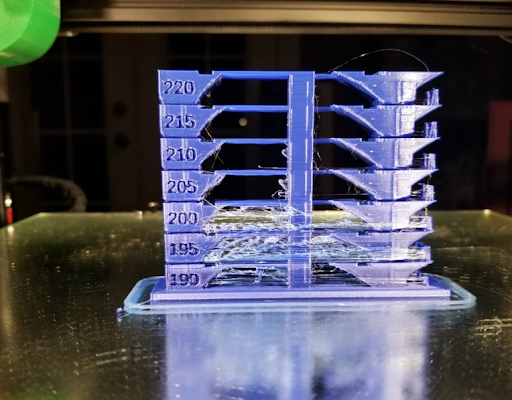
1.8. Melting, bending
3D printing products may melt or deform due to improper temperature
3D printing products may melt or deform due to improper temperature. Some printed layers may bend, dent, sag, etc. The main reason for this problem is that when melted at too high a temperature, the material does not have time to cool. This is one of the problems that makes the printed object unusable due to the loss of its original structure.
The solution to this situation is very simple:
- Temperature reduction: it is necessary to regularly review the values of the layer fan and ensure stable temperatures. High temperatures can facilitate more fluid extrusion, and reducing the temperature helps cool the printed layer. The material will then cool quickly and we will be able to obtain optimal results.
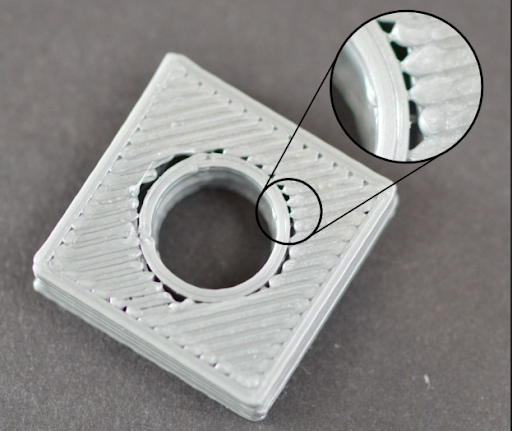
1.9. Elephant foot phenomenon
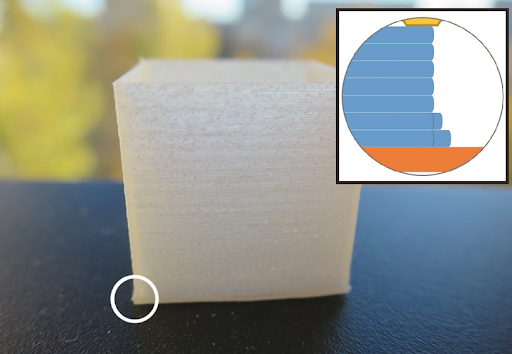
The cause of elephant foot was determined to be that the nozzle was too close to the 3D printing bed
Elephant feet are a common defect in 3D printing. This is a defect in which the horizontal plane of the first layers is extended more than allowed. The cause of this problem was determined to be that the nozzle was too close to the 3D printing bed, causing the first layers to be flatter and expand more widely. In addition, if the print bed temperature is too high is also a factor causing this error on the printed object.
Common solutions to this problem include the following:
- Adjust the nozzle distance: this will help us create the first printing layers with the most accurate proportions.
- Adjust the print bed temperature: when the bed temperature is high, the print layer temperature will be too high. This can cause the newly deposited resin to expand and deform, causing an elephant's foot effect.
1.10. Temperature variations
3D printing may fail due to temperature fluctuations
3D printing may fail due to temperature fluctuations. They lead to uneven or over-extrusion of the print. A common cause of this temperature fluctuation is due to damaged or clogged heater box leads.
A quick solution to fix this situation is to carefully check the heating box's pipes to avoid cracks or breaks.
Read more: What type of plastic is used in 3d printers?
2. Conclusion
In conclusion, 3D printing is one of the modern and popular production methods in many fields. In fact, the 3D printing process also has the risk of facing many unnecessary problems such as problems related to the print bed, printing temperature, nozzles, extruders, etc. However, many useful and diverse solutions have been proposed for the above problems. Understanding possible problems and solutions will help a lot in the production process.
3. About EuroPlas
EuroPlas is proud to be one of the most reputable and trustworthy material suppliers worldwide. You can easily find and buy bio-filler, color masterbatch, plastic additives, engineering plastic compounds, and bioplastic compounds, etc., with just a click of the mouse. Besides, come to EuroPlas' blog today to update more useful materials information. We are a provider of optimal material solutions with a series of high quality plastic lines. Our solutions meet the diverse needs of the world's industries, not only in terms of high standards and reliability but also in terms of environmental obligations.